
Quickstart
Use the Forage iOS SDK to accept EBT SNAP payments in your iOS app.
Looking for the Forage mobile app?Get instant EBT balance checks and access to exclusive grocery deals—download Forage on iOS or Android and start saving today.
In this guide, you'll learn how to:
- Set up a Forage iOS app
- Add and style a Forage Element
- Perform payment operations
- Tokenize and store a payment method
- Check the balance of a payment method
- Capture a payment
Prerequisites
- Sign up for a Forage account (contact us if you don't yet have one)
- Install:
- XCode v14.1 or newer
- iOS v13 or higher
- Swift v5.5 or higher
- The following third-party libraries:
- LaunchDarkly
- BasisTheory
- CocoaPods (optional) to install the SDK and manage dependencies
For more information, see:
- Payments API reference docs
- Forage iOS SDK on GitHub, including a sample app and iOS SDK reference docs
Step 1: Set up a Forage iOS app
1. Add an endpoint to your server that creates a session token
A POST to the Forage /session_token/ endpoint creates a session token.
Environment Variable Best PracticesThese examples assume you're using a
.envfile. Update them as needed, but never expose sensitive data like tokens in client-side code.
// app.js

const axios = require('axios')
const express = require('express')
const bodyParser = require('body-parser')
require('dotenv').config();

const app = express()
const port = 5000

// Middleware to parse the request body
app.use(bodyParser.urlencoded({ extended: true }))

app.post('/api/session_token', async (req, res) => {
  try {
    const apiUrl = 'https://api.sandbox.joinforage.app/api/session_token/'
    // Replace the below with your authentication token
    const authenticationToken = process.env.AUTHENTICATION_TOKEN
    // Replace the below with your Forage merchant ID
    const merchantId = process.env.MERCHANT_ID

    const headers = {
      Accept: 'application/json',
      Authorization: `Bearer ${authenticationToken}`,
      'Merchant-Account': merchantId,
      'Content-Type': 'application/x-www-form-urlencoded'
    }

    const response = await axios.post(apiUrl, null, { headers })

    res.json(response.data)
  } catch (error) {
    res
      .status(error.response ? error.response.status : 500)
      .json({ error: 'Something went wrong' })
  }
})

app.listen(port, () => {
  console.log(`Server is running on http://localhost:${port}`)
})
# app.rb
require 'sinatra'
require 'net/http'
require 'json'
require 'dotenv/load'
class ApiController < Sinatra::Base
post '/session_token' do
begin
api_url = 'https://api.sandbox.joinforage.app/api/session_token/'
# Replace the below with your authentication token
authentication_token = ENV['AUTHENTICATION_TOKEN']
# Replace the below with your Forage merchant ID
merchant_id = ENV['MERCHANT_ID']
uri = URI(api_url)
http = Net::HTTP.new(uri.host, uri.port)
http.use_ssl = true
headers = {
'Accept' => 'application/json',
'Authorization' => "Bearer #{authentication_token}",
'Merchant-Account' => merchant_id,
'Content-Type' => 'application/x-www-form-urlencoded',
}
response = http.post(uri.path, nil, headers)
if response.is_a?(Net::HTTPSuccess)
json_response = JSON.parse(response.body)
content_type :json
json_response.to_json
else
status response.code
{ error: 'Something went wrong' }.to_json
end
rescue StandardError => e
status e.respond_to?(:status) ? e.status : 500
{ error: 'Something went wrong' }.to_json
end
end
end2. Install the iOS SDK
You can either use CocoaPods or XCode's built-in Swift Package Manager (SPM) to install forage-ios-sdk.
CocoaPods
If you haven't already, install the latest version of CocoaPods. Run the following command if you don't have an existing Podfile:
pod initAdd the below line to your Podfile:
pod 'ForageSDK', '~> 4.4.4'Run the installation command:
pod installTo update to the latest version of the SDK, run:
pod repo update
pod update ForageSDK
Xcode
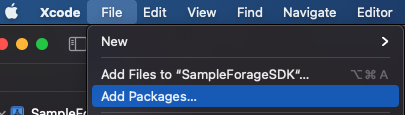
Navigate to Add Packages…
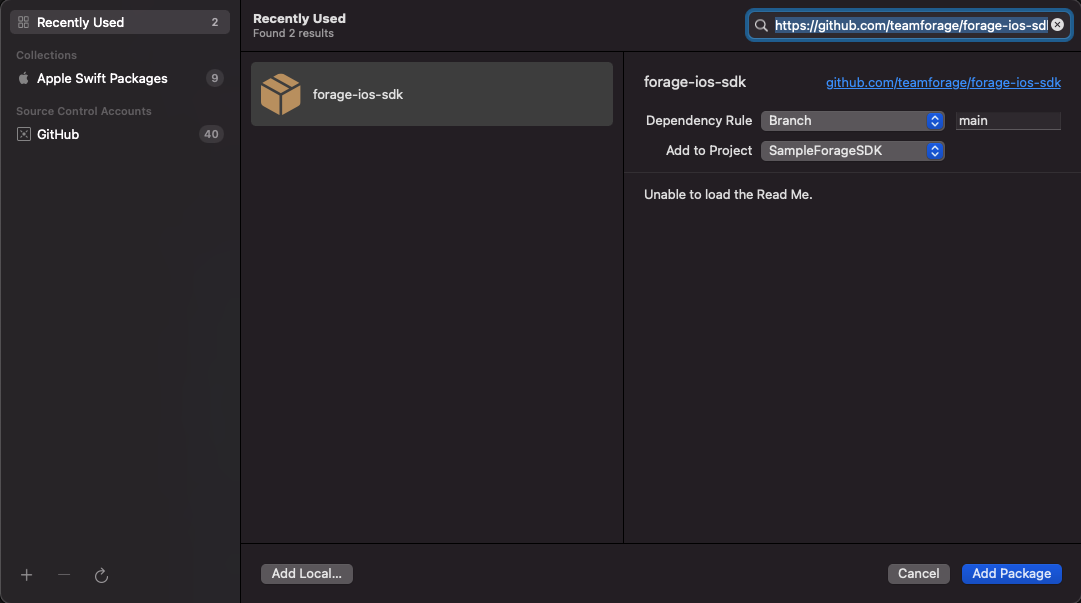
Add the https://github.com/teamforage/forage-ios-sdk dependency. Set the Dependency Rule to Branch and type main for the branch name. Finally, click Add Package.
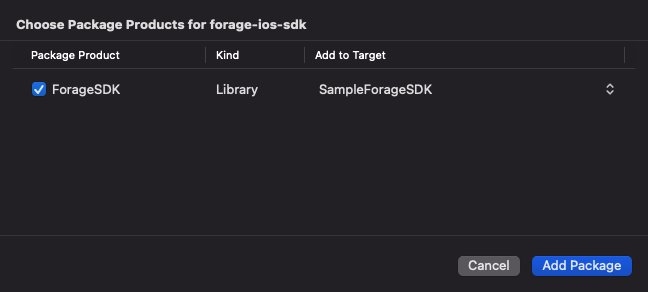
On the next screen, select the package ForageSDK, and once again click Add Package.
For more detailed instructions, consult the official Apple SPM guide.
3. Import the SDK
Add the following import to the top of every file that uses the library.
import ForageSDK

// your code here
4. Initialize the SDK
Set up a request from your front-end to your backend that asks the server to generate a session token.
In your app's primary ViewController.swift, call ForageSDK.setup to initialize the SDK. Pass a ForageSDK.Config object that specifies the merchantID and the server-generated sessionToken.
// ViewController.swift

ForageSDK.setup(
  ForageSDK.Config(
    merchantID: "d5685d56ed",
    sessionToken: "sandbox_eyJ0eXAiOiJKV1Qi..."
  )
)
Step 2: Add and style a Forage Element
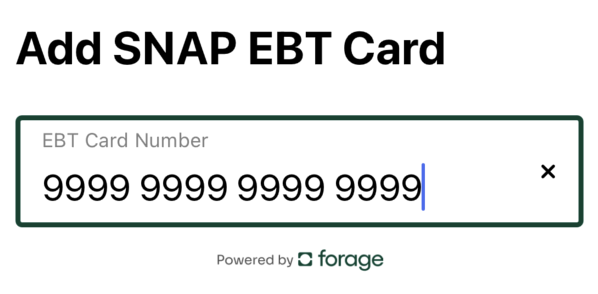
A Forage Element is a secure, client-side entity that accepts and submits customer input for a transaction.
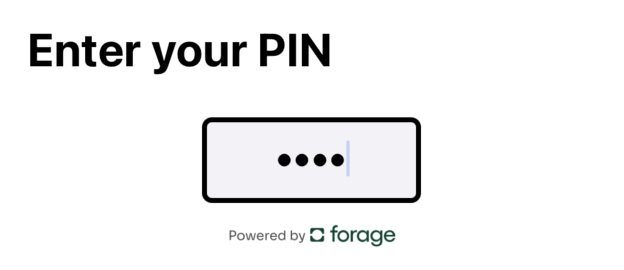
The iOS SDK includes an Element for collecting a card number, ForagePANTextField, and an Element to collect a card PIN, ForagePINTextField, both pictured below.
ForagePANTextField
The DerivedCardInfoProtocol defines inferred information about the ForagePANTextField.
public protocol DerivedCardInfoProtocol {

    /// The US state that issued the EBT card, derived from the Issuer Identification Number (IIN),
    /// also known as BIN (Bank Identification Number).
    /// The IIN is the first 6 digits of the PAN.
    var usState: USState? { get }
}
This field can be accessed through the derivedCardInfo property.
foragePanTextField.derivedCardInfo.usStateForagePINTextField
1. Initialize the Element
To add an Element, call the method to initialize the Element in a View.swift for a specific payment operation. You can set styling properties after calling the method.
Example:ForagePANTextField
The below example initializes a ForagePANTextField Element via a call to ForagePANTextField() in a CardNumberView.swift and specifies some styling properties:
// CardNumberView.swift

private let foragePanTextField: ForagePANTextField = {
  let tf = ForagePANTextField()

  tf.placeholder = "Card Number"
  tf.borderColor = .black
  tf.borderWidth = 3
  tf.clearButtonMode = .whileEditing
  tf.cornerRadius = 4
  tf.font = .systemFont(ofSize: 22)

  return tf
}()Example:ForagePINTextField
The below example initializes a ForagePINTextField Element via a call to ForagePANTextField() in a CheckBalanceView.swift and specifies some styling properties:
// CheckBalanceView.swift

private let foragePinTextField: ForagePINTextField = {
  let tf = ForagePINTextField()
  tf.borderRadius = 10
  tf.backgroundColor = .systemGray6
  tf.textAlignment = .center
  return tf
}()
For more information, see How to style Forage iOS Elements.
2. Set up text input validation
Forage validates an Element's input as a customer types. To notify customers of input validation errors, you'll need to conform to the ForageElementDelegate protocol, and listen for the Element's ObservableState.
The focusDidChange method is triggered when an Element gains or loses focus.
foragePanTextField.delegate = self// signature
public protocol ForageElementDelegate: AnyObject {
func focusDidChange(_ state: ObservableState)
func textFieldDidChange(_ state: ObservableState)
}
// usage
extension ForagePanView: ForageElementDelegate {
func focusDidChange(_ state: ObservableState) {
if state.isFirstResponder { ... } // element gained focus
else { ... } // element lost focus (blurred)
}
func textFieldDidChange(_ state: ObservableState) {
// show an error message on blur if the input is invalid
if !state.isValid && !state.isFirstResponder { ... }
}
}The ObservableState protocol defines properties reflecting the state of an Element.
public protocol ObservableState {
  /// Indicates whether the input is focused.
  var isFirstResponder: Bool { get }

  /// Indicates whether the input is empty.
  var isEmpty: Bool { get }

  /// Indicates whether all validation checks pass, excluding the the minimum length validator.
  var isValid: Bool { get }

  /// Indicates whether all validation checks pass and the ForageElement is ready for submission.
  var isComplete: Bool { get }
}
In the View.swift for the payment operation, indicate the delegate in the primary render() , as in the following example for the ForagePANTextField in the CardNumberView.swift :
// CardNumberView.swift

public func render() {
  foragePanTextField.delegate = self
  setupView()
  setupConstraints()
}
Then, specify the ForageElementDelegate as an extension in the file. Set the state to ObservableState. Define functions to handle state changes in the extension as well.
The below example sets up an extension for the ForagePANTextField in the CardNumberView.swift :
// CardNumberView.swift

extension CardNumberView: ForageElementDelegate {
  func focusDidChange(_ state: ObservableState) {
    updateState(state: state)
  }

  func textFieldDidChange(_ state: ObservableState) {
    updateState(state: state)
  }
}
3. Establish the ForageElement as the First Responder
ForageElement as the First ResponderFinally, in the Controller.swift for the payment operation, call becomeFirstResponder() to set focus on the Forage Element.
The following example calls the method as part of the lifecycle methods in a CardNumberViewController.swift :
class CardNumberViewController: UIViewController {
  override func viewDidAppear(_ animated: Bool) {
    super.viewDidAppear(animated)
    customView.foragePanTextField.becomeFirstResponder()
  }
}
Step 3: Perform payment operations
Tokenize and store a payment method
How To Tokenize With PAN FieldTo tokenize an EBT Card number, use the
ForagePANTextFieldElement.
Building on the example CardNumberView.swift, call the ForageSDK.shared.tokenizeEBTCard method.
// CardNumberView.swift

ForageSDK.shared.tokenizeEBTCard(
  foragePanTextField: foragePanTextField,
  // NOTE: The following line is for testing purposes only and should not be used in production.
  // Please replace this line with a hashed customer ID value.
  customerID: UUID.init().uuidString,
  reusable: true
) { result in
  // Handle result and error here
  switch result {
  case .success(let paymentMethod):
    // Handle the PaymentMethod here (balance, card, reusable, etc.)
  case .failure(let error):
    if let forageError = error as? ForageError {
      // handle forageError.code, forageError.httpStatusCode and forageError.message
    }
  }
}
Check the balance of a payment method
How To Check BalanceTo check the balance of a payment method, use the
ForagePINTextFieldElement.
Clear PIN Field After SubmissionYou must call
clearText()after collecting a PIN. FNS requires clearing the input field once submitted.
FNS Requirements For Balance InquiriesFNS prohibits balance inquiries on sites or apps that allow guest checkout. If guest checkout isn't offered, adding a balance check is optional.
Repeat Step 2 for a new ForagePINTextField Element, in summary:
- Initialize the Element in a
View.swiftfor the payment operation, in this case something likeCheckBalanceView.swift - Set up text input validation for the
ForagePINTextField - Establish the Element as the FirstResponder in a
Controller.swiftfor the payment operation, in this case something likeCheckBalanceViewController.swift
Then, from the CheckBalanceView.swift, call the checkBalance method. Passing in references to the ForagePINTextField and a previously created Forage PaymentMethod , as in the below:
// CheckBalanceView.swift

private func checkBalance(
  pinTextField: ForagePINTextField, paymentMethodReference: String, completion: @escaping () -> Void
) {
  DispatchQueue.global(qos: .userInitiated).async {
    ForageSDK.shared.checkBalance(
      foragePinTextField: pinTextField,
      paymentMethodReference: paymentMethodReference
    ) { [self] result in
      foragePinTextField.clearText()
      switch result {
      case .success(let balance):
        // Handle the Balance here
      case .failure(let error):
        if let forageError = error as? ForageError {
          // Handle forageError.code, forageError.httpStatusCode and forageError.message
        }
      }
    }
  }
}
Capture a payment
How To Capture A PaymentTo capture a payment, use the
ForagePINTextFieldElement.
Clear PIN Field After SubmissionYou must call
clearText()after collecting a PIN. FNS requires clearing the input field once submitted.
Repeat Step 2 for a new ForagePINTextField Element, in summary:
- Initialize the Element in a
View.swiftfor the payment operation, in this case something likeCapturePaymentView.swift - Set up text input validation for the
ForagePINTextField - Establish the Element as the FirstResponder in a
Controller.swiftfor the payment operation, in this case something likeCaptureViewController.swift
Then, you have two options for capturing the payment. You can either defer payment capture to the server or capture the payment immediately.
Option 1: Defer payment capture to the server
From the CapturePaymentView.swift, call the deferPaymentCapture method. Passing in references to the ForagePINTextField and a previously created Forage Payment and then calling clearText() on the Element, as in the following example:
ForageSDK.shared.deferPaymentCapture(
  foragePinTextField: foragePinTextField,
  paymentReference: paymentReference
) { result in
  pinTextField.clearText()
  switch result {
  case .success(let payment):
    // Handle the Payment here
  case .failure(let error):
    if let forageError = error as? ForageError {
      // Handle forageError.code, forageError.httpStatusCode and forageError.message
    }
  }
}
When you're ready to capture the payment, from your server call the Forage Payments API endpoint to capture a payment.
For more information see the Forage guide to deferred payment capture
Option 2: Capture a payment immediately client-side
From the CapturePaymentView.swift, call the capturePayment method. Passing in references to the ForagePINTextField and a previously created Forage Payment and then calling clearText() on the Element, as in the following example:
// CapturePaymentView.swift

private func capturePayment(
  pinTextField: ForagePINTextField, paymentReference: String, completion: @escaping () -> Void
) {
  DispatchQueue.global(qos: .userInitiated).async {
    ForageSDK.shared.capturePayment(
      foragePinTextField: pinTextField,
      paymentReference: paymentReference
    ) { result in
      pinTextField.clearText()
      switch result {
      case .success(let payment):
        // Handle the Payment here
      case .failure(let error):
        if let forageError = error as? ForageError {
          // Handle forageError.code, forageError.httpStatusCode and forageError.message
        }
      }
    }
  }
}
Updated 3 months ago